Olivia's Playroom~A Fun and Functional Play Space

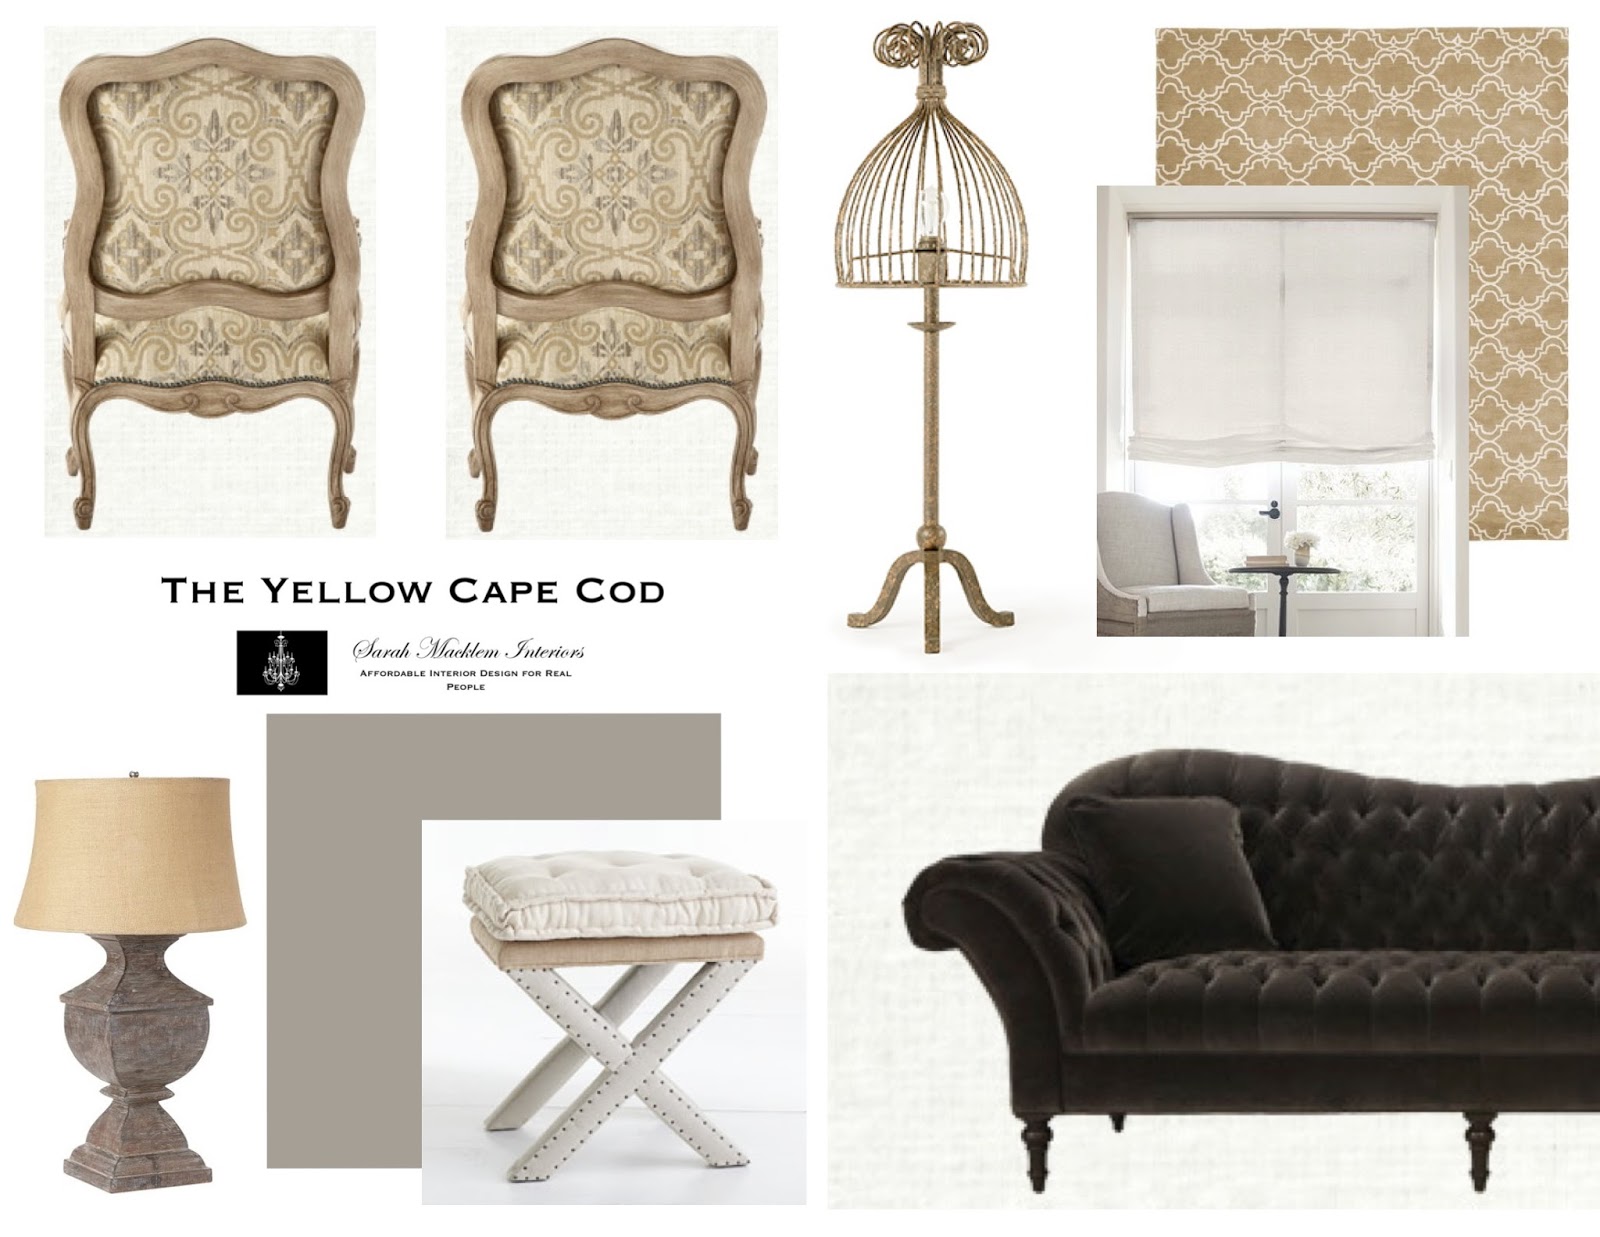
Today's featured design board is part of a recent online design plan for a playroom designed for a little girl, Livy.  Livy's parents recently finished their basement and created a gorgeous room that will be designated as Livy's play space.  


Our goal in this project was to create a design plan that was fun and functional.  And of course, beautiful.


We gave them comfortable seating in the form of this adorable sectional from PB Teen and kid friendly oversized bean bags.


These end tables are super fun for a kids space...


Bright colored inspirational art from Etsy, family photos and Livy's own art gallery provide colorful and personal decor throughout the space.  


These adorable twin lamps are perfect for additional lighting to warm up the lower level space. 
Fabrics were also used to cozy up the design, gorgeous drapery, fun toss pillows and beautiful rugs all play a part in creating a comfortable and inviting atmosphere.


The fun color palette of gray, turquoise and yellow will be grounded by brand new, gleaming dark hardwood floors.


Our hope is that this space will not only be inspiring to Livy, but also a room the whole family will enjoy.  Thank you, for inviting me into your home. 

If you are interested in an online design consultation, I'm currently accepting new clients.  Please click here to get started. 

© Copyright 2013 The Yellow Cape Cod
For information on my affordable online design service, please click here.

Mountain Nursery Details and Product Sources

Hi! I hope you are having a great week.  We are busy at The Yellow Cape Cod working on brand new design plans.  Thank you, for the amazing opportunity to design your space(s)!  I have so many exciting rooms to share, please stay tuned throughout the summer to see our most recent projects.

Today, I'm sharing the details on the mountain nursery I designed and implemented in Denver. 
If you're new to the blog, here is the story...  This project began as a typical online design plan project for Brian and Heidi's nursery.  Until I decided to fly to Denver to install the room, all by myself (no painters, carpenters or design assistants) in just two days (which is where the "challenge" comes in). 


The furniture in this space was chosen by the clients (crib, dresser and rocking chair) before the design plan began.  It is a really pretty set from Babies R Us and it fit right into our design.


The new oversized drum ceiling pendant light we chose is from 


Hand painted "Let him sleep…" sign, 


"Stitch" our model, is a French Bull dog.  He and I quickly became best friends.  I miss his cute face already and I hope he keeps his promise to write.


The fabulous bedding (sheet, quilt, bedskirt) and drapery is from Carousel Designs.  
The adorable mountain pillow is by  La petite echarlotte (Strasbourg, Alsace, France).


To personalize the space, we added photos of Heidi and Brian (the parents) climbing the Rocky Mountains.  The frames we used were from Potterybarn Kids. 


Accessories for the space were purchased at various discount home stores.  The white lamp and shade were picked up at Bed, Bath and Beyond.  The original plan included a green gourd lamp, but at the last minute a delivery snafu sent us scrambling for another option.


Thank you for joining me on my trip and for following along as I installed this design.  
It was a lot of fun having you with me and sharing the behind-the-scenes details.


This trip was an amazing adventure!  Not only did I get to do what I love most, but I made some fantastic new friends and had the opportunity to see the mountains for the first time.  :)


My final post on this experience will be a tutorial on the mountain mural project coming next week (which will include paint colors). 

This Two Day Makeover series includes:

8. Details About the Space
9.  Easy Step-by-Step Mural Tutorial


© Copyright 2013 The Yellow Cape Cod
For information on my affordable online design service, please click here.

Soft Blue and Coral Master Bedroom Retreat


Today's featured design board is from an online design plan we just wrapped up for a gorgeous master bedroom suite.  Our goal was to give her a sophisticated, unique design using a combination of her existing items and new pieces.


To cozy up the large space,  we brought in a pair of chairs and a fabulous tufted ottoman to create an inviting seating area either at the foot of the bed, or along the wall.


The bed is the main focal point in the space.  Layers of new bedding and a fresh coat of paint on her headboard (to match a new dresser we introduced) give her existing bed a sumptuous new life.


Flanking the bed are two nightstands in a painted finish.  These character rich end table are from Ballard designs.  The same look can also be achieved by purchasing a consigned set of nightstands and giving them a makeover with paint and new hardware. 


The color scheme for this space began with her existing soft soft blue wall color.  We added white, navy and coral accents to give her an amazing custom palette.  Large scale art can make the difference between a nicely decorated space and a space that has the designer wow factor.   Making an investment in large scale pieces and saving on other smaller items is a good way to balance the project allowance.


The art we suggested for Maddie's bedroom would fill the wall space nicely, and bring personality and color in an uncluttered way.  These prints are 29" x 29" and big in personality.  After finding them for Maddies space, I added them to my collection of favorite home decor.  "Maddie's Prints" can purchased in my shop by clicking here.  


Thank you, Maddie for inviting me into your home.  We enjoyed working with you in your amazing space!


© Copyright 2013 The Yellow Cape Cod
To reserve your affordable online design plan or for more information please click here. 

Easy DIY Hand Painted Monogram

At the end of this post, I'm sharing a comical behind the scenes outtake from this project...
Today's project tutorial was written while working in a room for a very special client, Kendall.  (Also known as Princess "K"). 


When I created the design plan for her bedroom, I wanted to incorporate a large monogram.  The design of the monogram had to compliment our bedding without competing with it, therefore it had to be simple. But pretty.


A monogrammed wall decal from Potterybarn Kids caught my eye, but wasn't going to work in this space.  It was beautiful and would have been quick and easy to install but the color was not the perfect companion to the custom wall color we choose for Kendall's room.


The solution was a hand painted version of the PB monogram using Kendall's wall paint. 

Here is how I did it…


I printed the image and took it to my local copy center.  For $5 they enlarged the image 300% onto blueprint paper.  I folded the image in half to create a line that would serve as a guide.  Using a level next to the fold line, I was able to make sure the image was nice and straight before taping it to the wall. 


Once the image was in the perfect spot, I peeled the corner back and inserted a sheet of wax-free pattern tracing paper.  Wax-free pattern tracing paper can be found at your local fabric store in the notions aisle.  It comes in many colors, I prefer to use white.


I traced the image using an ink pen.  Without disrupting the placement of the image, I moved the tracing paper around as I went along. 


Once the image was completely traced, I filled it in with a detail paint brush and two coats of paint.  After the paint was completely cured, I gently removed my white tracing guide marks with a damp cloth.

Thank you for letting me decorate your room, Princess K. 
Before you go, take a look at the finished monogram and see 
if anything stands out to you…


While proofreading this tutorial, I noticed one of the loops around the outside of the image was missing.  The copy center accidentally cut it off when they enlarged the image.  My initial reaction was to re-write this post after adding the missing loop, but I decided to post it as is. This blog is all about "real" decorating experiences, right?

Gotta go add the missing loop, have a great weekend!
Linked up to Home Stories A to Z


© Copyright 2013 The Yellow Cape Cod
For information on my affordable online design service, please click here. I'm currently accepting new clients.

Mink and Butterscotch Living Room


Hi!  Hope you're having a great day.  Today, I have a full day in the design studio.  I am so excited about the room I am working on that I thought I would share a sneak peek…


I'm giving them two floorplan options, this is one of them.  


The other option is to remove the piano and round rug and add another accent chair and larger area rug.  Stay tuned for the reveal to see which option they chose. 


There is so much more to this room, including a surprise accent color. This post is just a little teaser.
I'm so excited to see this one come to life and I absolutely can't wait to share the reveal with you.  

I currently have openings for new online design projects if you have a space that needs a fresh new look.  Click here for more information. 

Back to work, thanks for stopping by!


© Copyright 2013 The Yellow Cape Cod
For information on my affordable online design service,please click here. I'm currently accepting new clients.

Pool House Styling Project


Today's post is tour of an all-season pool house that I had the incredible opportunity to style.  The homeowners already had a great start in this space.  They asked me to add the final layer by helping them coordinate rugs, fabrics and accessories. 


The space belongs to Sara and Erik.  They love to spend their summers outside, with their two young children enjoying their amazing backyard oasis.  This space serves as their summertime living room.


The room is an all-season space but still has some exposure to the elements.. 
including an occasional wet bathing suit. 


Therefore, we chose durable materials such as an indoor/outdoor area rug. 


You would never know it was an indoor/outdoor rug.  It is amazingly soft and beautiful enough to be used in any interior space.  We also selected a companion to this rug for the lounge area next to the pool. 


Sara and Erik love to entertain family and friends in this space.  Therefore, many of the accessories double as serving pieces.


You may remember my post the other day on summer time centerpieces that included this fern-in-a-basket. I used the fern as a large scale coffee table centerpiece.  It easily be set aside when the coloring books and board games come out. 


Sara commissioned her favorite local artist Julie Abbott to paint this gorgeous custom piece…


This piece describes Sara's favorite things…smiles, kisses, wine and summertime.  It's a beautiful piece that adds a ton of her awesome personality to the space. 


  Their existing furniture was given a new life with new seat cushions, custom covers and lumbar pillows. Sara hired a local seamstress for this project and was pleasantly suprised at the cost. Using the rug as our color pallette inspiration I helped her choose indoor/outdoor fade resistant fabrics from an online fabric retailer.


Blue and teal look amazing against these crisp white walls.  Just outside the window is their gorgeous pool that reflects this color palette.


Punches of coral were added throughout the room in pillows, throws and accessories. 


Large pieces of driftwood, sand and shells are perfect summer time accents.  When fall rolls around these items can easily be changed to something more harvest-esque.  


The goal in this styling project was to give the room a finished, pulled together look while keeping the space comfortable, practical for the outdoors, usable and family friendly.  


Thank you, Sara and Erik for inviting me into your home and allowing me to style this space.  It was so much fun working in such a beautiful room.


Enjoy your summer!


© Copyright 2013 The Yellow Cape Cod
For information on my affordable online design service,please click here. I'm currently accepting new clients. 

Related Posts Plugin for WordPress, Blogger...
 
SITE DESIGN BY DESIGNER BLOGS