Showing posts with label blog cabin. Show all posts

Our First Camp Fire At The Blog Cabin With Duraflame Logs

This post is sponsored by Duraflame. 
It's been a busy summer and I've really been missing The Blog Cabin. This week, I decided to pack up the Design Studio and my youngest son and take them with me to the Northern Woods. During the day, I've been working away on some really exciting online design projects, and in the evening, Max and I have been crossing projects off the Cabin Makeover To-Do List. Last night, we decided to take a break and have my sister and my nephews up for a campfire.  


It was the first campfire since the Fire Pit Makeover my boys and I completed a few weeks ago. If you missed that post, we created a beautiful brand new fire pit in one day for less than $100. You can read about it HERE. I decided that Christening the new fire pit was a pretty exciting moment and should be celebrated. I ran into town and grabbed everything we needed for a perfect summer evening around the fire...

S'mores, Sparklers, Citronella Candles, Mason Jar Cocktails, and Sorry!


When my sister and the boys arrived, I quickly snapped a picture of them before they inevitably became covered in dirt, marshmallows and chocolate. I wanted to have a picture to commemorate this special day. This is the start of many years of campfires around the new fire pit and I wanted to remember the moment. 


(My son Max and Nephews Jax and Jet).


After the photo shoot, we headed to the back yard to get the fire started. But first, the boys had to extract the frogs that recently made our fire pit their digs. 


Once the frogs were set free, I started the fire using Duraflame Roasting Logs. This was my first experience with Duraflame logs and I couldn't believe how simple they were to use. Sometimes having a big fire with real wood can be a daunting task, but these logs seriously made it so easy. All I had to do was place them in the fire pit and light the packaging on fire with a lighter. Within a few minutes we had a roaring fire. The logs were lightweight and compact which made them very easy to travel with. 


When I first saw how light and compact they were, I was skeptical that they would produce a fire large and hot enough to cook over. However, after the fire was lit, I could see that using a stack of four logs gave out plenty of heat and enough intensity to roast marshmallows and s'mores over a warm, crackling, glowing fire. One thing I really appreciated about the Duraflame log fire was the lack of a bellowing smoke cloud that can make a traditional wood log fire less enjoyable.


My Mom suggested we try a new S'more recipe using Reese Peanut Butter Cups instead of Hershey Bars...
Five sticky thumbs up, Mom!


According to My Sister, Max and Jax, the first fire at The Blog Cabin Fire Pit was a huge success. According to Jet, a third S'more would have made it perfect...


Thanks for letting me share our first campfire adventure with you. Thank you to Duraflame for sponsoring our Fire Pit Makeover and for providing a supply of Duraflame supplies to last through our first summer at The Blog Cabin. 


To see more projects featured in The Blog Cabin Makeover Series, Please Click on the links below:


We currently have openings for new Online Design Projects (E-Design). If you're interested in getting started on a room makeover in your home, please click here to make your reservation.

*This post is sponsored by Duraflame. I received compensation and product to facilitate this post. All opinions are completely honest and 100% my own. 


DIY - Installing Click Laminate Floors at The Blog Cabin

 *We currently have openings for new Online Design Projects, please click here for details. 

This post is sponsored by Select Surfaces.
The Blog Cabin Makeover Project is coming along! So far, the most dramatic change has been the installation of brand new laminate floors in the Living Room and Bedroom. I'm especially proud of this project, because I did 90% of the work myself. This was the first time I've ever installed flooring and I have to say that it was relatively simple and fun!

Here is a peek at the Living Room "Before"...


(Before)


As you can see, it had wall to wall carpeting that had seen better days. The first night I spent at the cabin, I had my sister come over to keep me company. We were struck with ambition and decided to pull up the carpeting. Using a razor blade, we cut the carpeting into long strips, rolled them up and carried them to the dumpster. The padding pulled up easily, there were a few areas where pet accidents had happened that required a little more attention.


The removal of the tack strips and nails around the edges took a little time, but was pretty easy.


I wasn't sure what I was going to find under the carpeting. I was lucky to uncover a nice, smooth, level concrete subfloor. Once the carpeting, padding and tack strips were removed, I gave the cement a good cleaning and it was officially prepped and ready to go. 


I wanted to apply a new flooring material that I could install myself, DIY style.  I chose laminate based on my desire for a budget friendly, durable, material that would look beautiful in the cabin for many years. I knew Select Surfaces Laminate from Sam's Club was the perfect choice. I have Select Surfaces Laminate Floors throughout my home and knew they would fit the bill at the cabin as well. They are designed to withstand "Light Commercial or Heavy Residential Use" which is perfect for my busy, high energy, life loving family!

Select Surfaces offered to sponsor this project and sent me several samples from their new  Laminate Elite Collection to choose from. I took the samples to the cabin and laid them out on the floor next to the knotty pine walls to determine which color I liked the best. 


I made the decision almost instantly to go with the sample that is on the second to left, Mocha Walnut. I loved how the color complemented the pine paneling and accentuated the dark knots. I brought in the area rug I bought for the space so I could see the how the new Living Room color palette looked with the different flooring color options. 


Doing this confirmed that Mocha Walnut was the right choice. 
Once I had my color selection locked down, I headed to my local Sams Club. I loaded up a cart with Select Surfaces Laminate in Mocha Walnut, a pizza, a pack of muffins and some snacks for the weekend.


 I stopped at home, grabbed my 14 year old son, and drove up to the cabin in a snow storm. Together he and I unloaded the boxes of laminate into the kitchen. We hung out for a few days allowing the product to rest and acclimate to the environment inside the cabin before installing it. 


While the laminate was getting used to it's new home, I studied the Step-by-Step Installation Guide and the Project Supply List  provided on the Select Surfaces website. I was happy to learn that I could gather all the tools and supplies I needed in one quick trip to a local home improvement store.


The first step was to cover the cement subfloor with a vapor barrier.  
Once that was out of the way it was time for the fun part, laying the laminate. I think the reason the project was so enjoyable was the instant gratification. As soon as the first few rows went down, you could see how beautiful the floors were going to look. 

As I worked along, I discovered that when locking the boards together, they snap together perfectly if you use a light up and down wiggling motion to put the tongue and grove edges together. A gentle motion works better than using force.


The first two or three rows took the longest. Once I got used to the process, I flew through the installation in the Bedroom and Living Room. After all the boards were down, I trimmed the access  vapor barrier around the perimeter. 


The gap left between the floating floor and the walls was intentional to allow for expansion. All of this information and more is covered in the Installation Guide. I used quarter round molding to cover the gap and finish off the look of my beautiful new floors.


The trickiest part of laying the laminate was making the cuts around the threshold area in between the Bedroom and Living Room. It took a couple of tries, but I got the cuts just right. I was prepared for this and bought a little extra material so I could make some practice cuts if needed. 


Voila!


The floors turned out beautifully and, just as I imagined, they completely transformed the space. I may or may not have laid down and rolled around on them a few times in my excitement, I'll leave that to your imagination. 


In true Designer fashion, the same day I finished the floors I brought in all of the other design elements to finish off the rooms. 


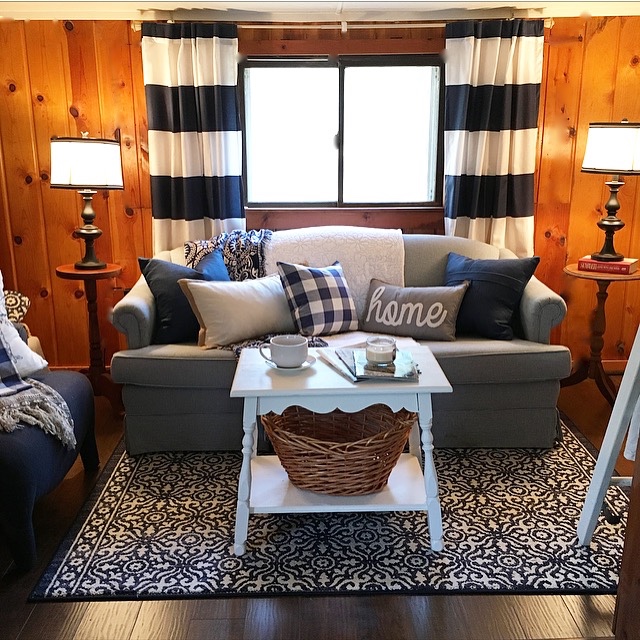
Here are some "After" shots of the Living Room...


(After)


(After)


(After)


Here's one more side-by-side comparison of the "Before and After"...


(Before) 

(After) 


Now that I know how simple the installation process is and how beautiful the results are, I can't wait to get started on the rest of the cabin! I'm using this product throughout the entire cottage (with the exception of the bathroom which will be tiled). Last weekend, I began prepping the Kitchen, Dining Room and Kids Bedroom...


When I pulled up the carpeting in these rooms, I uncovered cement subfloors that were not as smooth  as they were in Living Room and Bedroom.

Here's a closeup so you can see...


These rooms will require a little more prep work to get them level and ready for the laminate. It's an easy fix, it just requires one more step that I'm going to share with you as I work along. Stay tuned! Thank you for letting me share my Blog Cabin DIY adventures with you! To see more posts in this series, please click here:


We currently have openings for new Online Design Projects (E-Design). If you're interested in getting started on a room makeover in your home, please click here to make your reservation. 

*Select Surfaces provided me with the product and sponsored this post. 
All opinions are 100% and 100% my own. 


SaveSave
Related Posts Plugin for WordPress, Blogger...
 
SITE DESIGN BY DESIGNER BLOGS