Showing posts with label the blog cabin. Show all posts

DIY Fire Pit Makeover in One Day For Less Than $100

This post is sponsored by Duraflame.

On my most recent visit to The Blog Cabin, I took the kids along to help me with some yard work. When we got there, they asked if we could have a camp fire at night like we used to when they were little and we spent our summers at the cabin. I checked out the old fire pit and decided it needed some work before we could safely have a fire. (Click here if you're wondering what The Blog Cabin Project is all about). 

It hadn't been used in years and wasn't in good condition...


(Before)

(Before)


The sad look on their faces prompted me to move the "Fireplace Makeover" to the top of the "Cabin Makeover Project To-Do List". If we're going to be there working on the weekends, we may as well have a little fun at night around the fire. My goal for the fire pit makeover was to keep it simple and budget friendly. I wanted to use what was already there and just improve upon it. The new fire pit had to be easy to put together. Time is of the essence with every project at the cabin due to the travel time back and forth and my busy day job. I allowed myself one day to get the job done. And, it was just me and my boys (ages thirteen and ten) there to do the work. 


Are you ready to see what we came up with?
Here is what me and the boys created in one day with less than $100...


(After)


Here's a look behind the scenes look at how this simple fire pit makeover came together ...
My little guy Max started us out by cleaning out the ashes and debris from the old fire ring. After it was clean, we decided to continue digging to make the hole for the logs a little deeper. At this point in the process, we decided the best part of working on projects at The Blog Cabin, is that we can do them in our PJ's! The squirrels up there don't seem to mind.  


Once the hole was prepped, I grabbed a can of high heat grill spray paint and applied two coats to the old metal ring for a fresh new look.  


 I ordered one ton of rocks to be delivered by the local landscape supply company. They were waiting for us when we arrived, however they, were waiting for us at the end of the driveway. Luckily, we had an old wheel barrow up there and we used it to move the rocks, three at time down the driveway and into the back yard. This was the most time consuming part of the process, but it gave myself and my boys (both wrestlers) a good workout. We placed the largest rocks around the ring first. Once we had a pleasing shape we layered on the small rocks. 


After all the rocks were in place, I filled in the ring with pea rock to create a nice, new base for firewood. I also surrounded the base of the new fire pit with a ring of pea rock to create a safe transition between the fire pit and the grass. 


It was tempting to run into town and buy new chairs for our new fire pit. Instead, I decided to stay true to my goal of keeping this project budget friendly using what we had. The old rusty chairs that were there had definitely seen better days, but they weren't completely gone. We gave them a second lease on life by scrubbing away the rust with a wire brush and spray painting them in a pretty green color with rust protection paint. 


The new green chairs blend into the scenery nicely, letting the new fire pit be the star of the show. We decided our first fire at The Blog Cabin will be a special event. We'll be heading back to the cabin in July and will celebrate the resurrection of the old fire pit with friends and family!


Here's the breakdown on the project cost...

One Ton of Rocks $65
Spray Paint $10
Pea Rock $20


My friends at Duraflame offered to sponsor this project and also sent me a box of goodies for our
very first fire pit party! Stay tuned, I'll be sharing the event right here on the blog!


We currently have openings for new Online Design Projects (E-Design). If you're interested in getting started on a room makeover in your home, please click here to make your reservation.

*Duraflame provided me with compensation to facilitate this post. 

The Blog Cabin Dining Room, My Mom and Balsam Hill

This post is sponsored by Balsam Hill. See disclosure at the end of the post.

The past few weekends I've been traveling to Northern Michigan to work on The Blog Cabin Makeover Project.  Today, I'm excited to share some of the progress I've made in the Dining Room! Thanks to my friends at Balsam Hill and inspiration from my Mom, the room is ready for a family meal.


 There are still a lot of projects that need to be completed in this room. New floors, lighting, and additional accessorizing to name a few. But for now, a fresh coat of paint, gorgeous florals and a beautiful vignette created by my mom have transformed the space.  

Are you ready to see the new Dining Room?
While I tell you about the inspiration behind the new design, let me show you around...


You may remember that I mentioned this cabin had been closed down and mainly used for storage for the past few years. It's one of three cabins on the property at my parents home in Northern Michigan. My mission is to give this little cabin a fresh new look, and bring it back to it's former life as a fully functioning house, one room at a time. My hope is that family will gather here for weekends filled with relaxation, fun in the great outdoors, family meals and creative projects. 


The look I'm going for is warm, welcoming and "all about family". Basically, I want the design throughout the cabin to say  "home". When I started planning this project and tried to pinpoint exactly what "home" looks and feels like, I reflected back to the house I grew up in. My mom has a super power for making every space she touches look and feel like home. Here spaces have a way of not only looking amazing, but feeling like a giant hug. She's a talented Decorator with a magic touch. I often hear her speaking to me subconsciously as I work on client projects in my design studio. Whenever I have a design dilemma, she's the one I call. If I'm stuck on a DIY project and need advice, she always has the perfect solution.


My inspiration for this new design came from her, both figuratively and literally. Figuratively because I channeled her several times while working here.  Literally, because in addition to using a lot of her things in this makeover, she actually styled the inside of this china cabinet with this pretty blue transferware collection years ago. The styled cabinet was one of the only elements that was left in the cabin after it was vacated and closed down to use for storage. As you can see, she is a master of styling and arranging. When I started the cabin makeover, I didn't want anyone to touch this cabinet in fear that if the dishes were disturbed, I wouldn't be able to get the styling to look as perfect as she did. 


This styled cabinet set the tone for the color palette and traditional approach I'm taking for the new design. When I began to work on the cabin tearing up the carpeting, installing new floors, performing furniture makeovers, painting the walls, fixing the plumbing, etc. etc. this styled cabinet sat, untouched, in a corner as a constant source of inspiration. 

Now, it's back to being the focal point of the new Dining Room. 


While the space still has a little ways to go for a big before/after reveal, it's starting to feel like "home". Everything we need for an elegant family meal is ready to go. Thanks to these amazing florals from the Balsam Hill Spring Florals Line, the cabin will be boasting realistic looking blooms every day.  These flowers brighten up the space and create a cheerful, welcoming atmosphere. Another element that depicts the look of home. 


I chose the Orange Tulip Stems and the Hydrangea Bundle to use in various areas of the cabin that need a little color and natural texture. For the table centerpiece, I selected the Orange Dutch Tulip Arrangement. The vibrant orange hue of the tulips brightens up the entire space and creates a stunning focal point. Each flower and it's foliage are incredibly realistic looking. I also ordered two gorgeous Ivy Topiaries that will be making an appearance soon in another room reveal at The Blog Cabin. 


Before I go, here's a look back at the space from a few weeks ago. My son, Max and I were there working on the cabin. You can see how the cabinet was pushed back in the corner. The carpeting was cut out around it so it wouldn't be disturbed as I worked on installing new floors, and painting the ceilings and walls. I even gave the cabinet itself a fresh coat of paint without moving a single dish, tea cup or tea pot!


(The Dining Room "Before")

(The Dining Room "Before")


Thank you to Balsam Hill for including me in the Lifetime of Love series, for providing me with the florals featured in this post and for letting me share just some of the ways my mom inspires me. 


Happy Mothers Day!


For information on my affordable Online Design Services, please click here.
*This post is sponsored by Balsam Hill. I received floral arrangements in order to facilitate this post. All opinions are completely honest and 100% my own. 

SaveSave

The Blog Cabin - Living Room Makeover Reveal

Featured in today's post are floors provided to me by Select Surfaces Laminate.

With every project I finish on the weekends at The Blog Cabin it get's harder and harder to leave (If you're wondering what The Blog Cabin Project is, click here). I mentioned I'd be starting this cabin makeover in the Living Room and Bedroom (which are connected). I did this so I'd have two comfortable, pulled together rooms to enjoy and relax in while I'm there working on the rest of the cabin. Today, I'd like to share some of the progress I've made so far. 

Here's a look back at what the Living Room looked like "Before"...


(Before)

(Before)


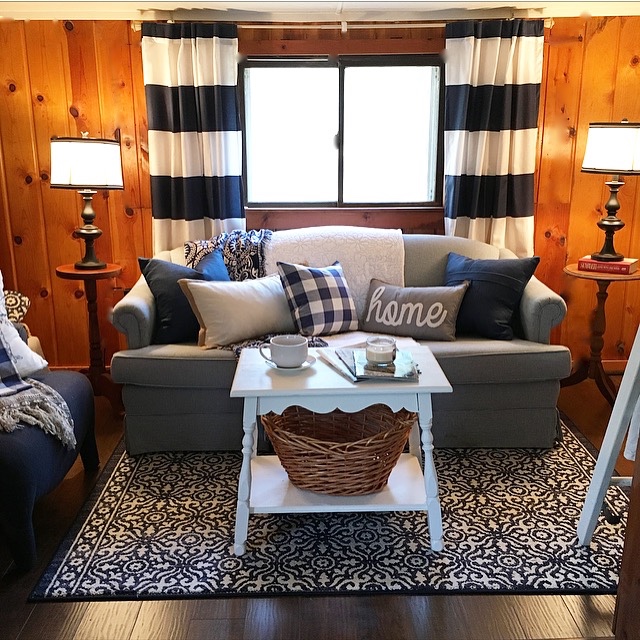
Here's what it looks like now...


Thanks to Select Surfaces Laminate, the makeover of this space began with beautiful new floors. More details to come on the floors later this week, including a behind the scenes look at the installation process. I'll also be sharing why I chose this particular product and how I came to a decision on the color.

For now, let me tell you about some of the other design elements while I show you around...


Outside of the flooring, the biggest design element in this area is the knotty pine paneling. The paneling is original to the cabin and gives it a ton of warmth and character. When my Mom gave me permission to do this makeover, her only request was that I didn't paint the paneling. I totally agreed with her that it'd be a crime in this instance. After all, my goal in this makeover is to preserve the original cabin/cottage charm of the place. Our family has a lot of memories here going back a few generations so I didn't want to change the look too much. 


I embraced the paneling by choosing a flooring color that complements it. I also incorporated a ton of cool, light colored accents to contrast with the rich, warm wood tones. Another one of my goals was to keep this makeover budget friendly by re-using items that were already in the cottage. Giving the existing furniture a quick coat of white paint unified the mismatched collection of items and also provided crisp contrast to the paneling and floors.


In addition to looking really cute, re-using the furniture that has been in the cabin for years invokes feelings of nostalgia for my family and guests. To take this feeling to the next level, I brought in some furniture that has special meaning to my family. Like this doll house that my dad built for my little sister when she was a baby. I'm using it for storage, the backside is open and is a perfect spot for storage baskets. 


I hit up my Mom's vintage decor stash to accessorize the space. I love how this white on white vignette brightens up this otherwise dark corner. I wanted to keep the look in this room very simple for now and continue to build on it with time. I'm hoping to host some "Pinterest Project Weekends" in the near future to create some custom art to personalize the cabin even more.


This sofa is a sweet piece that could probably stand to be replaced soon as it has seen quite a few years of use. For now, I've piled it high with quilts and pillows from HomeGoods and Etsy to cover the areas of wear. It seems to beckon visitors to run and jump on it, which in my opinion is a good reaction. Maybe it will stay a little while longer. 


The "coffee table" was previously a TV stand. After a quick coat of paint and the addition of a storage basket underneath, I decided it made a great coffee table. It's a little taller than a coffee table really "should" be, but it's perfect for me. This is where I sit to blog when I'm at the cabin and having my laptop up a little higher is nice. 


This cabin has a few awkward little areas. This is one of them. There used to be a wood burning stove in this corner, which is no longer in place. This has left an opening in the wall that could be a major project to fix or design challenge to work around if I let it be. Instead, I decided to embrace it and make it an interesting, useful storage feature. I found an old ladder, painted it white and filled with folded quilts. Leaned up against wall in the niche it disguises the old chimney. It also invites you to come in, grab a quilt and snuggle up for the weekend.  


If you've ever visited Michigan, you know it gets dark pretty early during the winter months. For added light, I've placed table lamps on each end of the sofa along with a small floor lamp in the corner. At night these lamps illuminate the knotty pine paneling creating a cozy, romantic atmosphere that's pretty close to the feeling of a giant hug. 


With all of these traditional design elements, I wanted to introduce a little drama. So, I brought in some bold patterns, and high contrast fabrics. I found the navy and white striped drapes at HomeGoods for a steal. Every cabin needs a dose of buffalo check, so I hit up Etsy for large-scale checkered pillows. Staying true to my goal of keeping this project budget friendly, I purchased the navy area rug at Walmart. I still can't believe I found it there. It's made by Mohawk and is one of the softest rugs I've ever owned. 


I can't wait to share more details about how this room came together. Stayed tuned for a post later this week dedicated to these gorgeous laminate floors! In addition to that, I'll be back on Thursday with a very special post with sneak peeks into the Dining Room at The Blog Cabin.


If you want to follow along on this adventure with me from the beginning to the end, you can do so by clicking on the links below. Thanks for stopping by!


To see all of the projects featured in my 31 Days of Design Series, please click here. 
For information on my affordable Online Design Services, please click here.

*This post is sponsored by Select Surfaces. I received laminate floors from Select Surfaces in order to facilitate this post. All opinions are completely honest and 100% my own. 


The First Project at The Blog Cabin - The Bed

Yesterday, I announced a makeover project I have in the works, "The Blog Cabin". If you missed that post, please click here for the story.  Murphie and I headed up to the cabin a couple weeks ago and met my mom and sister for a weekend of cleaning and organizing. It was fun to see the space begin to take shape just by clearing it out. I spent a few days there dreaming up design ideas. The first items on my To-Do List include some labor intensive projects.  I realized that in order for me to balance this extra weekend work along with taking care of my family and running the design studio during the week, that I'll have to fit in some quality rest while I'm there.

Here is a picture of the main bedroom from the first night I spent at the cabin...


 I decided the very first night that I had to establish a restful, peaceful sleeping environment before I even thought about starting any of the bigger projects. In order for me to tackle these projects with my "A" game a good nights sleep is a must. The next morning, after my coffee, I got to work on the bedroom. 


I drove into town to visit the local hardware.  I found a warm, soothing white paint color to freshen up the walls and ceiling ("Wedding Cake" from Ace Hardware) and grabbed some painting supplies. I headed back to the cabin and got busy painting the entire bedroom.  


(Before) 


I asked my mom to whip up her recipe for homemade black chalk paint to give the existing vintage bed a new look. (Here is her recipe: Stir together 1-1/2 cup black latex semi gloss paint, 1/2 cup water, 1/2 cup Plaster of Paris mix). 

Once the paint was ready, I put my sister to work painting the bed. 


 (After)


 I headed home and began to put together a sumptuous bedding ensemble to create a bed geared for ultimate relaxation and rejuvenation. 

It started with these luxury bedding basics from Reverie...


The Luxe Performance Collection  sheet set is absolutely amazing. These sheets feel unlike any sheets I have ever felt before. They are incredibly soft and silky and have a feeling of coolness upon touch. If you're like me and love the feeling of cool sheets, these are for you. They are temperature regulating, cooling sheets that are breathable and moisture wicking. 


For pillows, I selected the Dual Slumber Pillow.  These pillows combine the gorgeous look of a high loft down pillow, with the feeling and comfort of a memory foam pillow! One side of the pillow is memory foam covered with cool to the touch fabric. The flip side is plush micro-fill that simulates down and feathers. 


Once an insanely comfortable base was established, I layered on the duvet and pillows. Instead of shopping for new, I pulled items from my stash of seasonal home decor. I went straight for red buffalo checks and stripes to create a fresh, crisp, cabin theme. Next to the new black finish on the headboard, it really depicts the simple, but striking "Contemporary Cabin" look I'm going for. 


 I found a small dresser in my mom's storage area and gave it a quick coat of the same paint I used on the walls. I placed it next to the bed to use as a nightstand. I styled it with a vignette of thrift store finds, an oversized clock from Homegoods and a small night light. 


Now that I have a warm, cozy, luxuriously comfortable place to rest, I can wake refreshed each day I'm at the cabin ready to work! Truth be told, I may actually sneak up there on occasion just to sleep in this bed ;). 


Click on the links below to read the entire The Blog Cabin Project Series:


For information on my affordable online design services, please click here. 
*Thank you to Reverie for kindly sponsoring this post. All opinions are 100% honest & completely my own.

Related Posts Plugin for WordPress, Blogger...
 
SITE DESIGN BY DESIGNER BLOGS