Welcome back to The Holiday Home Series at The Yellow Cape Cod. There are no rules when it comes to holiday decorating. It's all about your traditions and what gives your family the warm and fuzzies.
With that being said, sometimes the warm and fuzzies come from the beautiful, professionally decorated trees at Macys. Being a third generation Holiday Decorator, my Mother and Grandmother have taught me some tricks of the trade. Today, I would like to share a few secrets on how to achieve the look of a professionally decorated tree at home.
Beginning with the most basic Christmas tree element, Bulbs.
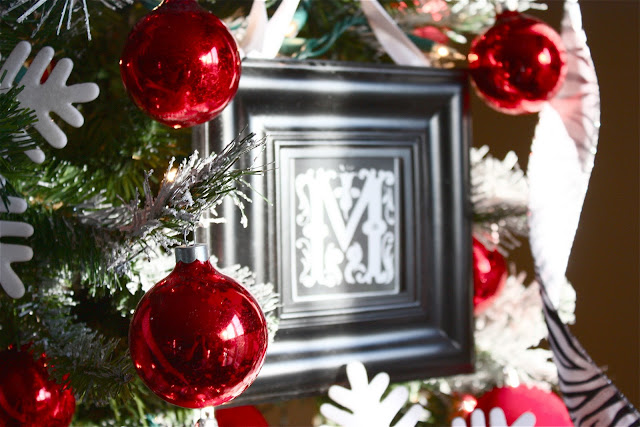
Using lots and lots of bulbs in the same color unifies a tree with an eclectic mix of ornaments.
Bulbs in the same color with variations in texture give the tree interest.
Shiny, glittery, flocked, matte finished bulbs all look amazing together and keep the tree from looking flat.
Lights.
Weaving your lights over and under each branch, and from the base of the branches to the tips will illuminate the tree from the inside out. It will provide amazing back light for your ornaments and give the tree a twinkling light effect.
Graphic elements.
Adding a large graphic design element (like these snowflakes from The Dollar Tree) will draw attention to the tree. It will also help space the other ornaments evenly by creating "compartments".
Adding unusual elements to the tree will give it a more "showcased" look. Like the trees you see in the retail stores. I made these monogrammed ornaments with frames from The Dollar Tree and free internet clip art.
Ornament nooks.
Take advantage of bare spots or openings in the branches to create little nooks for showcasing ornaments that are special.
Balance.
To create a perfectly balanced tree, place small bulbs on the top branches,
medium sized bulbs in the middle,
and large at the bottom.
Depth.
Hanging ornaments deep inside the branches creates depth. Depth is the key ingredient to a professional looking tree.
Ribbon.
For perfect ribbon curls, let the ribbon fall naturally from the spool. Then loosely hang the ribbon vertically from the top of the tree. The less the ribbon curls are manipulated, the better they look.
The last tip I would like to share is very important. If you find yourself getting frustrated, stop. Take a step back and sip a spiked eggnog.
Enjoy the process and you will enjoy the result so much more.
Thanks for stopping by.
To view the entire Holiday Home Series, please click here.
For information on my affordable design services, please click here.
I am now accepting new online design projects!
To view the entire Holiday Home Series, please click here.
For information on my affordable design services, please click here.
I am now accepting new online design projects!


I adore decorating the tree! I love the flocked look of your tree-I hope to find one at an end of season sale this year, for next years family room tree =)
ReplyDeleteLove your tree! Love the tip on the ribbon..how many pieces do you have? I love ribbon but I can't seem to get it right! Also, wanted to say thanks for the Holiday series...I'm really lovin' it!
ReplyDeleteHow pretty!! I already have lots of the Dollar Tree frames left over from my daughters wedding in July...they were used on the tables at the repection. Thinking I might do a wreath for her and my SIL with a b/w print from their wedding.
ReplyDeleteBlessings,
Linda
Very,very, pretty!!! I love the red! I am a traditional christmas colors girl~~ Your home needs to be showcased in the Detroit News' Homestyle Magazine....
ReplyDeleteOh I wish I'd read this post before I'd put up our tree! I'm not sure I could ever get my tree to look that good but I'm going to try my hardest next year!
ReplyDeleteThanks for the excellent tips!
Best wishes,
Natasha.
I like that last tip the best!!! Oh and how about leave the room when your husband puts up the lights??? Go read blogs and come back later and rearrange :)
ReplyDeleteYour tree looks so pretty: love the flocking, the zebra ribbon, the red, white & black palette! This makes me want two trees this year - one for the family, and one just for me!
Thanks for sharing your tips.
I so love all your post!!
ReplyDeleteYou have the best tips and inspiration!
Thank you!
xo
LOVE!! I'm getting antsy to put up my own tree now! Looks gorgeous, and your home looks so welcoming for holiday guest!
ReplyDeleteWhat a beautiful tree! Thank you for all the fabulous tips.
ReplyDeletewow! great post!! this will come in handy this weekend!!
ReplyDeleteGreat tips! Love the idea of adding large graphic elements.
ReplyDeleteAmazing. I love it. I always wondered how to get the ornaments to balance. Thank you!
ReplyDeleteThank you! Those were some great tips and I needed to learn that bc I have never been that great at decorating our tree! I would love for you to come share this at our link party right now...junkintheirtrunk.blogspot.com/2011/11/link-it-up-wednesday-4.html
ReplyDeleteSo, THAT'S what I was doing wrong ... I totally forgot the last step ... I'm off to get egg nog right now. LOL. I love your tree ... I have the same jumbo snowflakes on mine, as well as on my kitchen soffits ... such great fillers. And, thanks for the great tips, too!
ReplyDeleteBeautiful tree and mantel! Great tutorials too! I would love for you to share them at my party! http://theshadyporch.blogspot.com
ReplyDeleteI'm in love with your theme. It's exactly what I wanted this year. But is there a whole picture of this beautiful tree? Would love to see it.
ReplyDeleteThis tree is gorgeous! Great tips for decorating. I'm trying to find a chart or a formula for how much garland I need to wrap around my 8' tree. Any advice?
ReplyDeleteHI! I have been following your Holiday Home series and Love it!! I was wondering if you have any tips on purchasing a faux tree? We have one that I got discounted from Walmart years ago, and I hate it! I would love to upgrade to a better tree, but I don't know what to look for to make sure it looks pretty, like yours!
ReplyDeleteGreat ideas and beautiful trees. I love Christmas and ALL that it represents. We love to decorate in celebration of Christ's birth and start doing so before thanksgiving.
ReplyDeleteThanks for sharing your ideas.
Are there any alternatives to a flocked tree? Don't want to go through the hassle or potentially ruining our nice tree. Would that faux snow sprayed on the tips have the same effect?
ReplyDeletei read a lot of these same tips year after year and i still haven't perfected my tree..can you pleeease come to my house! :) Bring all the accessories you used in this blog and i'll just pay you ;)
ReplyDelete*Sigh* if only.
Great tips! I also find that putting reflective or mirrored-style ornaments deep in the tree (near the trunk) helps to reflect the lights and brighten the tree!
ReplyDeleteUse icicle lights pushing them to the center of tree pull each strand to the tip of branch. You can manipulate where each strand go.
DeleteA few years ago I wound lights around each branch, front to back, ala Martha. The tree looked amazing, but it was so much work that I swore I'd never do it again. lol
ReplyDeleteI used to decorate trees for a nursery/Christmas Wonderland in my area, I appreciate these tips, they are all good, my only side note would be this: they are Christmas BALLS, the "bulb" would be a light, this was something that made all of the employees crazy, it is so common for people to use them interchangeably..please, please, please...BALLS =)
ReplyDeleteAnonymous, Very interesting! Thank you for sharing. I love your passion on this topic. :) Merry Christmas, Sarah
DeleteI'd love to know where you found that red star for the top of your tree. It's beautiful!
ReplyDeleteBeautiful! What is the color black that you use so often?
ReplyDeleteBeautiful! Thanks so much for the tips! Will you share a picture of the full view of the decorated tree once you finished?
ReplyDeleteI am using your Snowflake tree in a Christmas Tree round-up I am doing on Monday... it is simple and darling and fun! Full credit is given to you with a link back here! Have a great Thanksgiving!
ReplyDeleteI super love the small black picture frames as elegant Christmas Tree Ornament. :) I am a sucker for art, elegance, and timelessness. And I think this idea greatly fits to that category! Thanks for sharing.
ReplyDeleteSo so beautiful!
ReplyDeletexoxo - Stephanie Lange*
www.redheadinredlipstick.com