
This post is sponsored by The Home Depot.
Today is the day I get to share an exciting project I've been working on behind the scenes. A staircase makeover has been on my mind for a while, and when I came across Cap A Tread Laminate Stair Covers at The Home Depot, I was inspired to get started. I was able to handle this project DIY style, with the assistance of my two teenage boys. It was really fun to work on it together and I loved sharing my passion for home projects with them.
Before I share the process and all the tricks I learned during this project, let me show you the dramatic transformation...

(Before)

(After)
Choosing The Right Color
Cap A Tread Stair Covers are available in tons of different colors. This makes it easy to find a color that coordinates with your other wood or laminate floors.

My local Home Depot did not carry all of the available stair tread colors in-store (most needed to be ordered) so I had to get a little creative to find the right shade. I realized they did carry many of the transition pieces (T Moldings, Stair Nosing) in various colors so I purchased a few and brought them home to use as color samples. Once I had the color samples narrowed down to two, I ordered two stairs to be sure I had the perfect color locked down before placing the entire order. When the two "sample stairs" came in, it was instantly obvious to me which one was my favorite... Highland Hickory. It's almost a perfect match to the floors in my living room and dining room which are both adjacent to my foyer. I had the option of purchasing risers in the same Highland Hickory finish, but I decided to go with the white-primed risers so I could paint them cream to match my trim for contrast.
Researching the Process
Before getting started, I did some quick research on the installation process. I found two videos that were extremely helpful. They spelled each step out so well, that after watching them I was 100% sure I could handle this project. I'm NOT a professional Carpenter, Builder or Contractor, but I do have basic knowledge of the tools needed for this project and a huge DIY spirit. The first video I watched is THIS ONE by THE HOME DEPOT and the second video is THIS ONE by ZAMMA. I highly recommend watching both of these videos in their entirety. They provide important info on measuring, cutting and installing this product.

Measuring and Ordering
There are two types of Cap A Tread stair tread covers; Type 1 and Type 2.
Standard Cap A Tread (Type 1) covers stairs treads that are 1" or less thick. If the thickness of your stair tread is 1.125" to 1.750" thick, you will need to order Type 2 Cap A Tread. I pulled the carpet and padding back an inconspicuous corner and measured the plywood tread underneath. My stairs required Type 2 Cap A Treads.
The Cap A Treads Stair Treads and The Cap A Tread Risers are both available in different lengths. The easiest way to make sure you are ordering the correct size is to measure your stairs and take those measurements with you when you place the order at your local Home Depot. My Associate was very helpful and even made a great suggestion to order a couple more pieces than I actually needed just in case I made any cutting errors (which I did make one). Just make sure you are aware of any potential restocking fees as this product may be considered a special order.
Demolition and Site Prep
This is the part where I brought my boys on board. They handled the demo and the prep for me like absolute pros. I introduced them to these tools... a hammer, a scraper, pliers, a flat screw driver and safety glasses.

Together, using these tools, they removed the old carpet and pad along with the tack strip, staples, and nails from the plywood treads and risers.


They also vacuumed thoroughly, a very important step to ensure glue adhesion.
Cap A Tread Installation
The tools/supplies needed to install the Cap A Tread system were; a table saw, a sliding compound miter saw, Heavy Duty Liquid Nails, a tape measure, a T Bevel, and a brad nailer with nails (if you wish to nail your boards as they suggest in the Zamma video).
According to the instructions, the installation of the Cap A Tread System needs to start on the bottom and go riser, tread, riser, tread, riser, tread, etc. until the entire staircase is complete. It's recommended that each riser and each stair is individually measured and cut, piece by piece, as they are installed. This is because most staircases are not 100% plumb, nor will every stair riser and ever stair tread be the exact same length.
I created a video that illustrates the process I used of measuring, cutting and installing the stair risers and treads. You will notice in the video when I measured the treads, I used a T Bevel tool in the corner of each tread. This is because my staircase was not plumb and this tool helped me find the angles needed to get a nice tight fight with little to no gaps.
Check out my installation video here:
Here's a quick recap of the steps...
Measured height and width of riser.

Transfered measurements onto riser.

Cut riser to length using the miter saw.

Cut riser to height using the table saw.

Applied Heavy Duty Liquid Nails to back of riser.

Pushed riser in place.

Measured width and depth of tread.

Found angles in each corner using a T Bevel.

Applied T Bevel angles to tread cuts using the miter saw.

Cut treads to depth using the table saw.

Applied Heavy Duty Liquid Nails to tread.

Pushed tread into place. (You can secure with brad nails in the very back if desired).

Allowed glue to cure, then touched up my gray wall paint...

I finished my project by painting the risers in the same custom cream color that I used on the trim throughout my home.
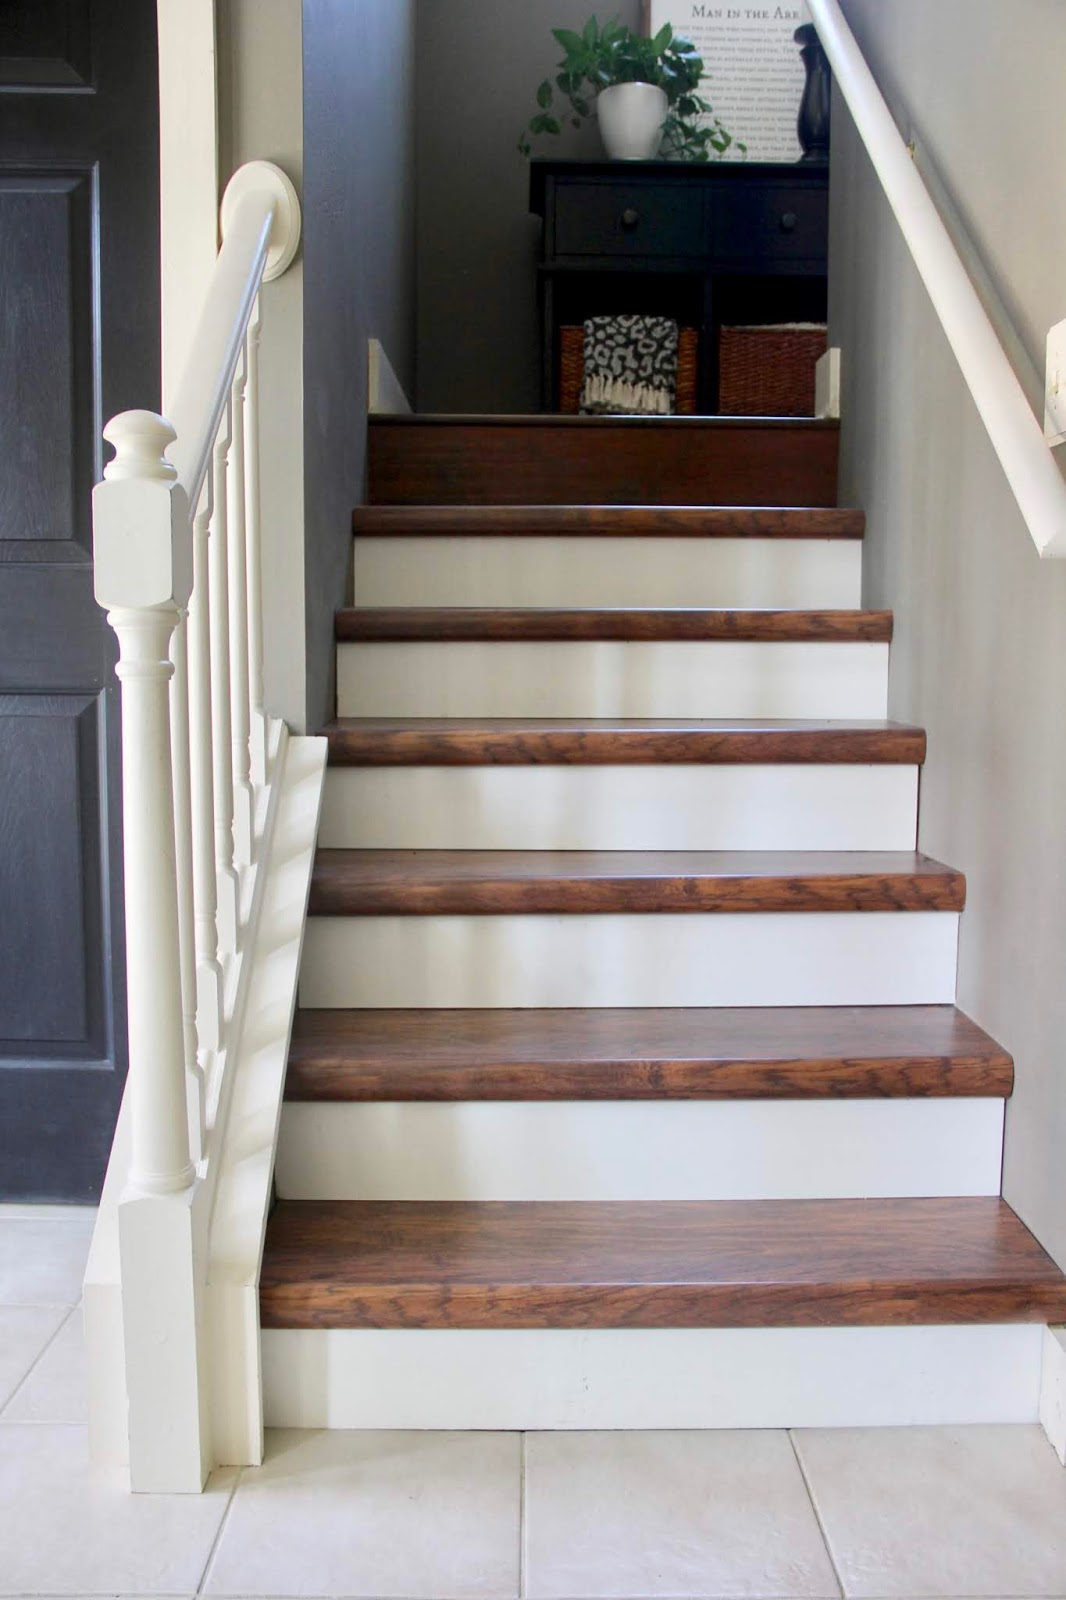
Here it is, all done!

Here's another look at the before and after side by side. This project has made a huge difference in our small foyer!


Thanks for stopping by and letting me share this project with you!

Before you go, did you check out my E Design Service? My Online Design Service is an affordable way to achieve a professional, custom, unique and cohesive design that suits your style preferences and budget. Please email me at TheYellowCapeCod@yahoo.com if you have any questions, or make your reservation here.

This post is sponsored by The Home Depot.


No comments:
Post a Comment