Moody Blue and Steely Gray Design Plan

Before the holiday posts begin, I'd like to take a little time to share what we have been busy working on every day behind the scenes. I'm very excited to have our online design services available again after being booked for the past few months.  If you are interested in learning more about our online design plan service, please click here for details.

This is a project we just wrapped up for some (very special) returning clients, Gary and Chris...

(Living Room)


They have been busy making updates and improvements to their home, including beautiful, brand new hardwood floors, fresh paint, new furniture and beautiful upgrades to their kitchen. They asked us to create a design plan that would finish off the Living Room and Kitchen to make them feel complete. 


(Kitchen) 


Using the fantastic paint color palette chosen by my clients (BM Symphony and BM Adagio), and the gorgeous new dark hardwood flooring and cabinetry they installed as our guide, we got to work creating a custom design plan to help them tie the two spaces together and give their home a finished look. 


(Living Room and Kitchen)


Accessories, new upholstery, rugs, toss pillows and stunning new window treatments were carefully chosen to give the spaces a fun, fresh, transitional design that Gary and Chris appreciate. We selected large scale items that will have big impact in the space. Large scale items allowed us to use the "less is more" theory while achieving a completely finished look. 

*One sneaky design trick that we used in this plan to create seamless flow between the two spaces was to repeat the same rug in both rooms. Gary and Chris already have the rug in a circle shape in the living room in front of the fireplace. Our suggestion is to purchase the same rug in a large rectangular shape to place under the dining table in the kitchen. 

Thanks for stopping by! Stay tuned for more of our recent design projects!

Product Sources:


Online Design Services are now available. Please click here for details. 

Reveal-Living Room Design Plan Comes To Life

Now Accepting New Online Design Clients (click here for details).

During the past few months, we have been so busy working behind the scenes in the design studio, that I haven't had a chance to post any of our recent projects. Today, I found a few minutes to share an exciting Living Room design that we completed a little while ago.  

Before I begin the story, here is a sneak peek…


Here is the design board from the plan that we created for Scott and Beth's new Living Room...


We began the design plan for this space while the home was still under construction. My clients, Scott and Beth, asked me to help them through the building process with finish selections and paint colors. Once the home was complete, we got to work creating a complete design plan for several rooms. We incorporated some furniture from their previous home and also made many new purchases. 


Having a design plan created before shopping for furniture helped them to visualize how the space would look and how all of the new pieces would fit before making any investments. A solid design plan can help new homeowners avoid making costly mistakes. Building a new home and implementing a whole house design can feel overwhelming, having a plan takes a lot of the stress out of the process. (Click here to see our multi-room discounted pricing).


Working on several rooms in a home at one time allows us to create seamless flow between spaces. Once we created the plan for Scott and Beth's home, they began implementing the design in their own timing as their budget and schedule allowed. 

Here are some of the other spaces we designed in this home...


(More on this space to come soon, it's still coming together and I can't wait to share it once it's finished)


(You may remember this room. It turned out to be one of the most Pinned spaces on Pinterest)


(One of my favorite little guys).


There will be more to share in Scott and Beth's home. We are in the process of wrapping up the kitchen and powder room. Next on our agenda is a design plan for their home office. 

Thanks for stopping by! If you would like to get started on a design plan for your home, please click here for the details on my online design service. We now have openings for new projects and would love to work with you whether it's one room or three!


Online Design Services are now available. Please click here for details. 


Fall Porch With Hayneedle Porch Rockers

Our front porch is my favorite spot in our home. It is what sold me on the house 12 years ago when we bought it. Since then, we have spent countless hours out here watching the kids play, visiting with neighbors and having long family conversations. It's usually where our big life decisions are made, celebrations take place and problems are worked out. 


We can be found out here throughout the four seasons. Due to the amount of time we spend on the porch, I like to go all out when it comes to seasonal decor. This fall, I teamed up with hayneedle.com to take my front porch decor to the next level with the addition of these beautiful, romantic, white porch rockers. (The Coral Coast Rocker's are available in three colors, AND, they happen to be on sale right now!)


I'm in love with the character they add to the front of our home and the bright white finish really brightens up the view from the curb for our neighbors. But to me, when I'm greeted by these rockers, I see so much more than a pretty design element. I see all the wonderful moments and conversations they have ahead of them. I see home and family.


Inspired by our new rockers, I went to town decorating the porch for fall. I picked up some beautiful mums and cabbages from local green house and placed them in urns I had tucked away.


Every year around this time, I bring out this special welcome sign that was hand painted by my aunt for our wedding 16 years ago (you can read all about our fall wedding here).


I also have a wreath made from our wedding flowers that usually adorns our front door in the fall, but after 15 years of Michigan elements, it is due for a little spruce up. So, this year I am using a bright and cheerful wreath I found at Sams club to take it's place until it ready for it's makeover debut next year.


For the fall season, I cozied up the front door by using one of my favorite indoor/outdoor area rugs in place of the doormat. Once the snow begins to fall, I'll have to switch it back for practical reasons, but for now we can enjoy the comfort of a real rug. 


For a little added drama and interest (not to mention comfort) I added a bold, graphic, black and white striped lumbar pillow to each rocker. These are also made from indoor/outdoor fabric that is weather resistant. By adding textiles like pillows and rugs, you can make your outdoor space feel more like an extension of the interior of your home. Our porch definitely feels like my favorite "room" in our home this fall. 


At the end of the fall season, the mums, pumpkins and cabbages will be taken away, but our new, beautiful rockers are here to stay. They are the staple to all of the seasonal decor that will take place here for years to come. Thank you to hayneedle.com for partnering with me on my 2015 fall porch decor. I appreciate how simple theses rockers were to assemble, in addition to the fantastic quality, comfort and beauty! 


Online Design Services are now available. Please click here for details. 
*hayneedle.com supplied these chairs to facilitate this review post. All opinions are 100% honest and all my own. 

Veteran Home Makeover With Team Depot

This post is sponsored by The Home Depot 

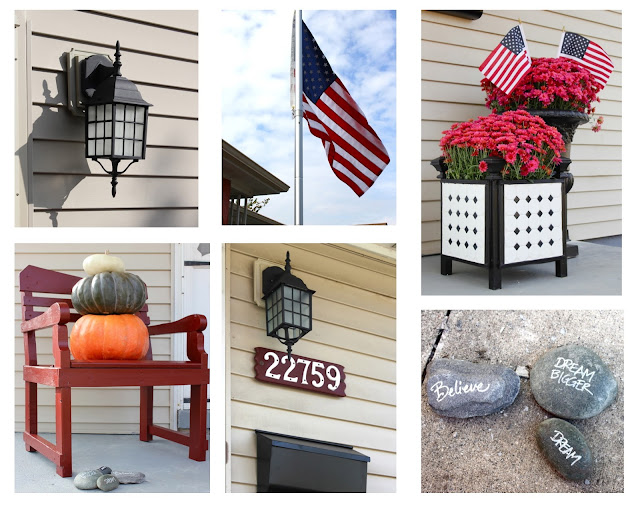
Last week I had the most amazing experience with Team Depot. We began a home makeover for a very special veteran couple that will include a new kitchen and bathroom as well as repairs and updates to the exterior of thier home. Last Thursday, we started the makeover by tackling the exterior projects including fresh paint, new chain link fencing, new outdoor lighting, cement repairs, a new concrete paver patio, a brand new privacy fence, outdoor patio furniture makeovers, new porch steps and railing as well as a few aesthetic additions. 

Before I get into all the exciting details, let me introduce our very deserving veteran, Ken…

(Ken and myself).

Ken lives in this home with his wife (who is also a veteran) and two adorable dogs. It was such a pleasure to meet him and work along side him and the Team Depot volunteer force. The day started early, we congregated outside Kens home for introductions. The entire team bonded and a sense of community was instantly in the air.


The very first project was the installation of a new flag pole followed by a dedication of the makeover and an official thank you to Ken and his wife for their service. The dedication was finished with the group joining together in The Pledge of Allegiance. And, of course the Team Depot cheer, nice and loud so the whole neighborhood knew who was in town.


It was obvious throughout the day that helping our Veterans is extremely personal to The Home Depot and it's employees (who happen to make up the Team Depot volunteer force). This is largely due to the fact that more than 35,000 of Home Depot associates have previously served or are currently serving in the U.S. Military.


Thousands of Home Depot associates spend their time off volunteering their talents as members of Team Depot in communities across the country. It was fun getting to know everyone as we worked to make improvements to the exterior of Kens home. Working together with these amazing people disguised the "work" we were doing as fun.


Not only did the projects we completed give Kens home a bright, fresh updated look, but the transformational projects helped to improve the safety and accessibility of his home for years to come.


Our team was able to complete most of the exterior work in just one day. 
Here are a few closeups of the projects we completed...


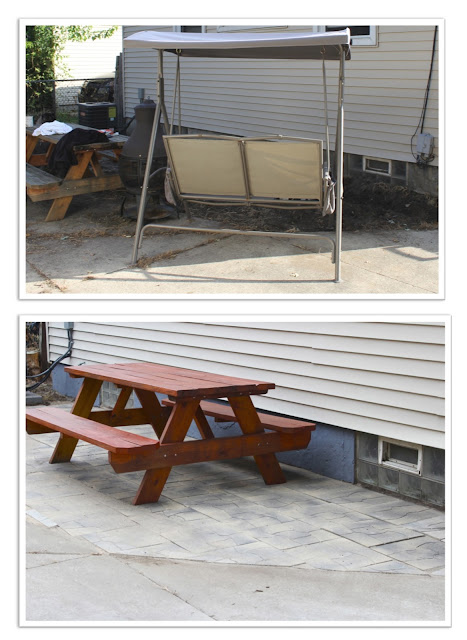
…and here are a few side by side before and after pics...

The Refreshed Garage and Brand New Privacy Fence


The Updated Front Porch, New Sidewalk and Steps, and Fresh Paint

(You may recognize the black and white tiled planter on the front porch. If you missed the post last week, this was a DIY project I made just for Ken and his wife. The full tutorial can be found here).

New Chain Link Fence


Brand New Paver Patio and Re-Finished Picnic Table

TaDa! Next it's on to the Kitchen and Bathroom where Team Depot will begin the makeover on the insde of Kens home!

Thanks for letting me share this amazing experience with you. If you would like to participate in the Celebration of Service movement, you can help to give back to our veterans by posting a selfie of you helping out our veterans with the hashtag #serviceselfie. For each service selfie shared, Team Depot will donate $1, upt to $1 million, to nonprofits that help veterans in need. 

Follow Team Depot on Facebook, Twitter andInstagram. 

Online Design Services are now available. Please click here for details. 

 * I acknowledge that The Home Depot Foundation is partnering with me to participate in this Celebration of Service program (the “Program”). As a part of the Program, I am receiving compensation for the purpose of promoting The Home Depot Foundation and its non-profit partners. All expressed opinions and experiences are my own words. My post complies with the Word Of Mouth Marketing Association (WOMMA) Ethics Code and applicable Federal Trade Commission guidelines.

DIY Tiled Planter Box Tutorial

This post is sponsored by The Home Depot. 
They other day I shared the news that I was working with Team Depot at a 2015 Celebration of Service Event here in Detroit. The project is to help a local Veteran with a home makeover that includes a new kitchen and bathroom, as well as home repairs and improvements to the exterior of his home. Part of my contribution to the project was to make a Custom Planter Box to gift our Veteran for his front porch. 

Here is what I created…


My inspiration for my planter box design came from beautiful black and white tiles that I found at The Home Depot. Without knowing ahead of time what the color scheme of our Veterans home was, I decided that black and white would be my best option (because black and white looks great with everything). 


This project turned out to be one of my favorite DIY Projects to date. Much of the reason for that was obviously because of the special person it was being made for. But also because working with tile is so much fun. It's not as difficult as one might think. If you would like to create A DIY Planter Box like this for yourself, here are the instructions...

Tools you will need:
A circular saw
A power drill and bits
Nail Gun
A caulking gun
Utility knife
Sand paper block
A paintbrush 
Tape measure
Pencil
Gloves 
Safety goggles
Sponge
Trowel

Materials you will need:
(4) 13"x13" pieces of plywood
(12) pieces of decorative molding cut in 13" lengths
Two 8ft 2x2s
A box of 3" exterior screws
Stain and polyurethane or outdoor paint
(4) Curtain Rod Finials (painted or stained to match planter box)
Construction Adhesive
Newspaper
Simple Mat Tile Adhesive
Tile
Grout
Caulk


Start by putting on your safety goggles and cutting the 2x2s into four pieces of 16" and eight pieces of 12". Using a sheet of fine grit sand paper sand each piece until it is nice and smooth. Wipe with a damp cloth to remove sanding dust. Apply your paint or stain and polyurethane finish according to the instructions on the product and allow it to dry.


Next, pre-drill and countersink the 2x2 pieces together with the 16" pieces forming the legs and the 12" pieces forming the support between the legs. Apply construction adhesive and then screw in the 12" support pieces in so that they sit at 12" down the legs. Then, grab your remaining four 12" 2x2"s, pre-drill, apply some  glue, space them evenly across the bottom and screw them into the frame.


Using the nail gun, secure one piece of 13"x13" plywood to each side of the frame to form a box. Cut the simple mat adhesive sheets to fit each plywood square and apply them per the manufacturers instructions on the simple mat packaging. 


Arrange tiles and press into place. Add decorative molding around the outside edge of the tiles using the nail gun. Caulk all of the seams (between the trim and frame) to give it a nice finished look. Once the caulk has dried, follow the manufacturers instructions to apply the grout to each side using your trowel and wipe away access grout with a damp sponge. 


Allow to set for 24 hours. Once grout is completely cured, give all wood pieces a light sanding to remove any qrout residue. Predrill a hole in the top of each corner piece and twist the finials into place. The last step is to paint over all trim pieces and allow to dry before filling with your favorite plant. 


I filled mine with a potted mum. If you would like to switch out the plants seasonally, using potted plants is the easiest option. Or, if you prefer a longer lasting option, you can line your planter with landscaping fabric secured inside the box with a staple gun, and fill with potting soil and plants of your choice. 


Stay tuned for all the details on the Celebration of Service Event in Detroit where  I delivered this planter to our very special recipient. I will also be sharing my experience working alongside Team Depot making over our Veterans home where this planter now resides. 

Thanks for stopping by!
Don't forget, for each #ServiceSelfie shared during Celebration of Service, Team Depot will donate $1, up to $1 million, to nonprofits that help veterans in need. Follow Team Depot on Facebook, Twitter and Instagram.


I acknowledge that The Home Depot Foundation is partnering with me to participate in this Celebration of Service program (the “Program”). As a part of the Program, I am receiving compensation for the purpose of promoting The Home Depot Foundation and its non-profit partners. All expressed opinions and experiences are my own words. My post complies with the Word Of Mouth Marketing Association (WOMMA) Ethics Code and applicable Federal Trade Commission guidelines.


Related Posts Plugin for WordPress, Blogger...
 
SITE DESIGN BY DESIGNER BLOGS