Dramatic DIY Staircase Makeover

This post is sponsored by The Home Depot. 

Every year, just before the holidays I get to urge to take on a house project. It may have something to do with the cooler weather and the natural nesting instinct that comes with Fall. Or, it may be that I want the house to look it's best for holiday guests. Either way, it happens each year and something exciting usually comes of it.


This year...it was a staircase makeover! 

I've been wanting to remove the carpeting from our stairs and have wood risers and treads installed for a long time. My stairs are the first thing you see when entering our home through the front door, and they were anything but exciting. 

Take a look...

(Before)


I've always put a staircase makeover project on the back burner, mainly due to the expense of having the job contracted out. Don't tell anyone this, but I worried it was too big of a project for me take on DIY-Style...until the day I came across Cap A Tread Laminate Stair covers at Home Depot! When I saw this revolutionary product, I realized a DIY Staircase Makeover was within my skill set! I could achieve the higher-end look I wanted in a way that was doable with my moderate DIY carpentry skills. 


Guys, I'm so excited about this makeover. It makes such a difference in our small foyer and adds so much to the look of my staircase.

I still can't believe I took it from this...


(Before)


To this...


(After)


And, I did myself...TYCC Fall DIY Project 2K19 is officially in the books!
Stop by tomorrow and I'll show you, step by step, how I did it!


Before you go, did you check out my E Design Service? My Online Design Service is an affordable way to achieve a professional, custom, unique and cohesive design that suits your style preferences and budget. Please email me at TheYellowCapeCod@yahoo.com if you have any questions, or make your reservation here. 

*This project was sponsored by The Home Depot. 


Makeover Reveal - Before and After - Gray and Yellow Living Space

*I currently have openings for new Online Design Projects. Please click here for information. 

You guys know my favorite thing is receiving "After" photos from my Online Design Clients. Well, guess what I got recently?...Take a look at this Sunroom I designed for my clients Shannon and Jim. They came to me for an online design plan to turn their empty sunroom into an family lounging area that is an extension of their beautiful dining room and kitchen...

Here is what the room looked like Before...

Before


And, this is what the room looks like now...


After 


After 


Here is a look at the design plan I created for them...I created this design plan after consulting with Shannon and Jim via my online client survey. They followed this plan to the T to achieve their new look...


Here is one more look at the design board...

And, another gander at the actual space...


Thank you, to my E Design Clients, Shannon and Jim, for submitting these before and after pics. I really enjoyed working with you both and you did an amazing job bringing your Online Design Plan to life! Enjoy your new Sunroom!

Thanks for stopping by today!


My Online Design Service is an affordable way to achieve a professional, custom, unique and cohesive design that suits your style preferences and budget. Please email me at TheYellowCapeCod@yahoo.com if you have any questions, or make your reservation here. 

Before and After -With Styling Tips To Dramatically Change Your Space

I currently have openings for new online design projects click here for info. 

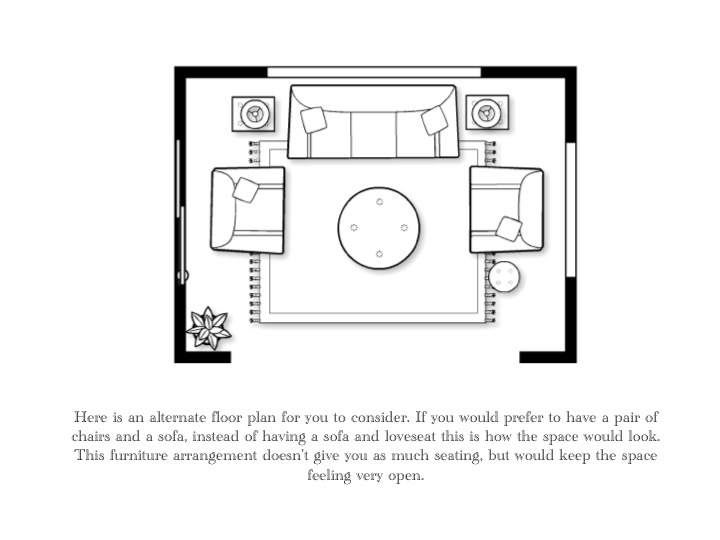
It doesn't always require a complete overhaul to achieve a new look in your space. Today, using a recent online design project as an example, I'd like to share a few tips on how you can change your look dramatically by adding/eliminating a few key elements. I recently had the privilege of creating an online design plan for Jennifer's Living Room. Jennifer had some great pieces in the space already and wanted to keep them. She asked me to keep most of her existing furniture pieces, flooring, stonework and woodworking. She wanted suggestions to refresh the space and give it a stylish, cozy, inviting, and cohesive new look while keeping most of the largest design elements. 


Here are some tips...

Neutralize The Space

To start a refresh, I suggest removing decorative accents, lamps, rugs, pillows and accessories from the space. That way, you will be starting with a clean slate and you can add things back in as you go. Doing this allows you to see your room in a new light and really helps you to decide which elements you love and which you may want to eliminate or replace.

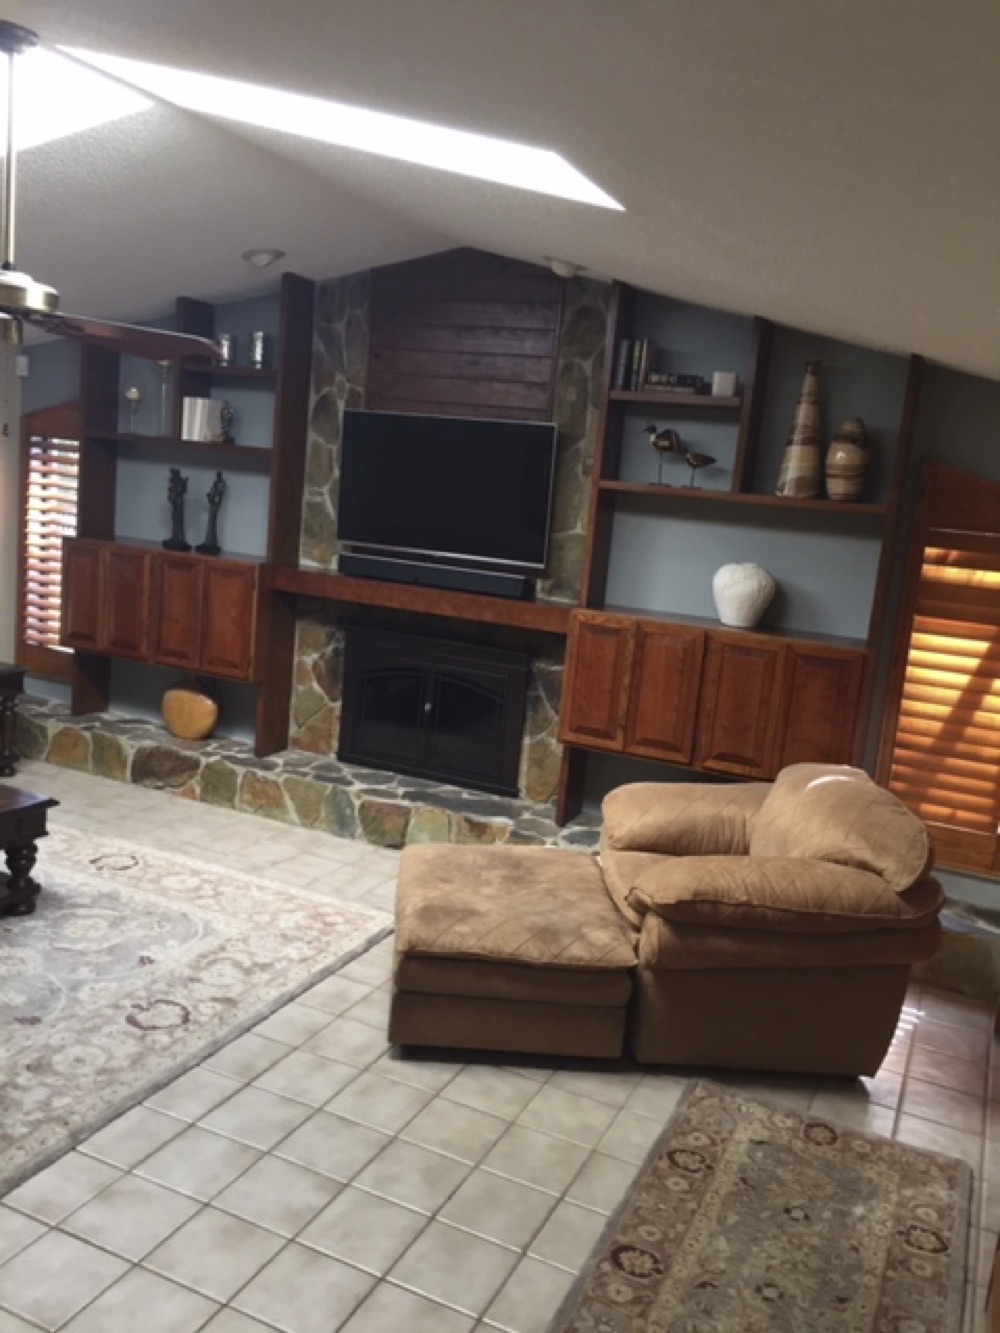
For example, during our consultation we determined Jennifer's chair was no longer working for her from a style standpoint or comfort standpoint. It was dating the space, and replacing it made a big impact on the overall look of the room. You can see how we went with a piece with a light colored slipcover to contrast with the woodwork. This is one of the first areas you see when you enter the room, and now it looks cozy and fresh.


Before 

After


Add a New Rug, Pillows and Throws 

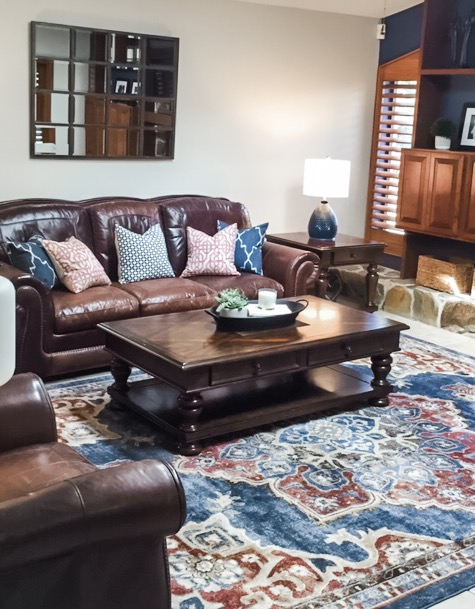
One of the first suggestions I made in Jennifer's Living Room Design Plan was to replace her current area rug with a larger rug to ground the furniture arrangement and add a big dose of color and pattern to the space. Then, I pulled colors from the rug when I made my selections for new toss pillows and throws. These items can be inexpensive and can have a big impact on the look of your room. I went with a bold trendy pattern on her pillows to give her space a fun, current, look. Take a look...


Before


After

You can see how adding a more vibrant rug to contrast with the floors instantly livened up the look of the room. While the previous rug was pretty, it was so similar in tone to the floor that it blended in and almost disappeared. Now, the new rug rug packs a big design punch. And the new toss pillows give her sofa a fresh new look.


Make A Big Deal Out of Your Focal Point

Instead of changing everything in your space, which can feel overwhelming and lead to analysis paralysis, I suggest changing up just the main focal point. To do this, first decide which area of the room is the focal point. Then re-evaluate the way you have it decorated. Does it make a statement? Does it grab your attention? Does the eye want to rest there? If the answer to any of these is no, then make some adjustments. 

In Jennifer's Living Room, the natural focal point is the fireplace wall. She had lovely wood tone bookcases and stonework featured here that she did not want to change. This woodwork and stone is used in other areas of her home and she wanted to maintain the flow. I was able to give her focal wall a new look without changing either of these main elements. 
Take a look...

Before


After

Navy grass cloth wall paper added to the wall gave this focal point a dramatic new look. It provided contrast with to the wood tones and stonework. Having this rich, dark, color also made the items I chose to style her bookcase stand out. Speaking of styling the bookcases...


Accessorize Intentionally 

 In the images above, you can see how styling Jennifer's Bookcases and filling the empty spaces with just a few well chosen items dramatically effects the overall look of the room. I didn't put a lot of things in the bookcases, I just placed things that were the proper scale to keep it looking full, but neat. I placed baskets on the bottom under the cabinets to provide additional storage and to add texture. Family photos on the first shelf of each side personalize her room and balance the focal wall visually. Symmetry in bookcase arrangements creates an eye pleasing base for styling. The top shelves were all different sizes so I selected items based on the dimensions of each individual area and I made sure the color of these items would pop against the new navy wallpaper. Contrast is another secret weapon to make your space exciting. 


Before


After


I gave Jennifer new lamps and a simple coffee table centerpiece. I kept a piece of her existing wall art in the room, but moved it to another wall. I selected candle wall sconces to flank it for dimension and to fill the large wall space. An over-scaled mirror was brought in to hang over the sofa. It bounces light around the space and provides a reflection of her lovely new room...


Add Loved Ones

The last tip I'd like to share today, is to add a few elements to your space that beckon your loved ones to use it. Adding small items that make your friends and family feel welcome and comfortable in your home will always enhance the overall look and feel. I think it's important to make our homes look beautiful, but not to take it so serious that we end up with a room that looks great, but no one wants to use it. Place a cute set of coasters on your coffee table to let folks know they are welcome to sit down with their coffee. A basket of toys, books or puzzles next to a large floor pillow lets kids know they can come in and stay awhile. Another example, adding a throw blanket over the arm of your sofa or chair not only looks welcoming and cozy, it provides a layer of protection from everyday use (think kids, fur babies, etc.). 

In Jennifer's Living Room, Rockstar and Zoe are feeling cozy on the new chair and loving all the changes. 


Thank you, to my E Design Client, Jennifer, for submitting these before and after pics. I really enjoyed working with you Jennifer and you did an amazing job bringing your Online Design Plan to life! Enjoy your "new" room!

Thanks for stopping by today!


My Online Design Service is an affordable way to achieve a professional, custom, unique and cohesive design that suits your style preferences and budget. Please email me at TheYellowCapeCod@yahoo.com if you have any questions, or make your reservation here. 

*As an Amazon Associate, I earn commissions from qualifying purchases. 

Outdoor Christmas Decor Design Plan

It might be too early to decorate for Christmas, but it's not too early to plan! I had an EDesign client come to me for a design plan for Christmas decor for the exterior of her new home. If you feel inspired by any of my finds and would like to check them out, I'm sharing links to each item throughout this post. 

After consulting with my client, I learned that she likes traditional Christmas decor colors, but also appreciates fun elements like black buffalo plaid! I came up with a design plan that includes fresh greens along with faux greens and easily obtained merchandise from places like Amazon that she can use year after year!

Here is a look at the design plan I created for her...


You can purchase these rugs here:


You can purchase this wreath, garland and ribbon here:


You can purchase fresh cut 3' evergreen trees here.  


You can purchase these lanterns and candles at Potterybarn. 


You can purchase these window candles here:


One last look at all of the elements together...


Thanks for stopping by! Don't forget to check out my Online Design Service. It's an affordable way to achieve a professional, custom, unique and cohesive design that suits your style preferences and budget. Please email me at TheYellowCapeCod@yahoo.com if you have any questions, or make your reservation here. 

*As an Amazon Associate, I may receive commissions on qualifying purchases.

Simple Halloween Decor Hack Adding Wiggly Eyes to Photos

One of my favorite Halloween decor hacks is cheap, fun, and never gets old even though I've done it for years...sticking wiggley eyes to our family photos. It is absolutely hilarious. When I was a kid, I saw someone doing it on a decorating show...when I became a mom I still remembered it so I gave it a try. I discovered that black and white photos provide the most impact.


To create a pretty vignette around our wiggley eye gallery, I found an adorable gray leopard throw blanket on Amazon to layer over my accent chair. This blanket is very budget friendly and lends that elegantly-spooky look I'm going for this year. It's available in a slew of colors, I went with "Gray".
This cute lumbar pillow, also from Etsy, spells out the season so there is no mistaking our wiggley eye gallery for everyday decor!


You can find a pack of wiggley eyes in the craft aisle at Walmart for less than a dollar...


Here are links to the throw and pillow I purchased on Amazon. Best part...both are available on Prime!!


Gotta love inexpensive, simple and pretty Halloween decorations that blend in with your existing home decor (and show up quickly on your doorstep). Happy Halloween, Friends!


My Online Design Service is an affordable way to achieve a professional, custom, unique and cohesive design that suits your style preferences and budget. Please email me at TheYellowCapeCod@yahoo.com if you have any questions, or make your reservation here. 

To check out more of my latest designs, please visit my Pinterest page. 
*As an Amazon Affiliate I earn commissions from qualifying purchases.


Related Posts Plugin for WordPress, Blogger...
 
SITE DESIGN BY DESIGNER BLOGS