Styling A Dining Room Hutch For Entertaining~Client Project


While I'm away from the blog {returning April 9th, 2012} I have scheduled a few post re-runs.  I thought in honor of the upcoming Easter holiday this would be a great post to replay.  Re-visiting this project today has me in the mood for a party...

One of my favorite things to do is style shelves/bookcases/hutches.  Whether it involves shopping for new items or using what the client has, I live for it.   Does anyone else have a fascination with this?


I recently had the privilege of styling this beautiful Drexel Heritage hutch.  This piece resides in a jaw-dropping dining room that belongs to a busy, young, professional couple that likes to entertain. 


{Before}


In keeping with my "function first" philosophy, I took the client shopping for pieces that look beautiful and also function for entertaining.


My goal was to make the shelves look nice for everyday visual purposes but more importantly, function. As a butlers pantry, of sorts, for parties.  


The baskets are not only gorgeous, but super convenient for entertaining.  You can see one of them is filled with party beverages, the other is for special linens.  When they are removed for use, the empty buffet surface is a perfect spot for food. 
The baskets also took the formality of the space down a notch.  


This family is Italian.  We chose large pieces to accommodate large amounts of pasta.  


The all white theme was based off of pieces that they client already had.  She has a beautiful collection of patterned pasta serving bowls.  The new solid white pieces compliment the patterned pieces and blends with them seamlessly.  The little pop of white brightened up the entire room.. 


The Drexel Heritage piece in itself is stunning.  By keeping the display simple,  we complimented the ornate design of the top of the hutch as opposed to hiding it.


I wish, I wish, (one fish, two fish) I could share the sources of the products shown here but out of courtesy to my clients, I am unable to spill.   One thing I can say, we found our inspiration for each piece at Potterybarn then hit discount home stores for similar products :)

Thanks for understanding. 
For information on my affordable design services, please click here. 

Linked up to:
Miss Mustard Seed


Spousal Design Conflict Tips~Family Room Design Plan

At the end of this post, I'd love to hear how you decorate around spousal design conflict.

I was recently asked to design a living room that posed a bit of a challenge.  I love a good challenge but this one really made me think.  How do I design a space for spouses with completely opposite design preferences?  A space that both will equally love.


After the wife described her style preferences to me, I pictured her dream living room to look a lot like this beautiful space from Centsational Girl... 


She loves light, airy, fresh, traditional designs. 
He is a Historian with a passion for dark, heavy, ornate, design.  If he could have it his way, he would live in a real castle.


My challenge was to incorporate both tastes, equally strong in opposite directions, into one cohesive design that reflects both husband and wife.  


I looked at it this way, if these two got together:


{Robinhood}


What would their space look like??

After working on this project, I came up with a few helpful tips for spousal design conflicts:


1.  Find a common thread between the two tastes and use it to the max.
(In this case, they both liked metal finishes.  I used mercury glass lamps for her and vintage pewter display for him).

2.  Find at least one piece that both agree upon and build the entire room around it.
(In this case it was a painting).

3.  Use art and accessories to bring both personalities into the space.
(In this case, the overall room palette was neutral but, the art and collectibles played up the castle theme and the fabrics and crystal chandelier said traditional chic design)

4.  Remember there is no right or wrong way to decorate.  Design is subjective.  It's ok to mix different styles within a space, eclectic interiors are hot.  Let the room reflect both of you, no matter how different your tastes are...you will have created your very own unique style. 


5.  Have fun.  In the end, this will be a great bonding experience as long as you both play nice during the process. One great way to make it fun is to have him pick something for the space that he thinks she would like and vice versa.


Has anyone else out there struggled with a spousal design conflict?  How do you decorate around it?  I would love to hear what has/hasn't worked for you.


White Washed Brick Fireplace~Tutorial

Before sharing today's DIY project, I wanted to announce that my E-Book "DIY Interior Design For Real People" is currently available in a gigantic bundle of 76+ DIY related E-books ($34.95 for the complete bundle) for the next five days only. Please click here for details.

A few weeks ago, I shared a living room before and after.  Since the post, I have received requests for a tutorial on the fireplace transformation.  Ask and ye shall receive.  


Meet Sarah and EJ (the homeowners)...


I've already introduced you to Zeke {the real owner of this space} but, in case you missed it,
 here he is again...


I've worked with them in a few areas of their stunning traditional style home.
These guys are not afraid to tackle a DIY project.  Not only are they not intimidated to try any kind of DIY project but,  they knock it out of the park every time.  


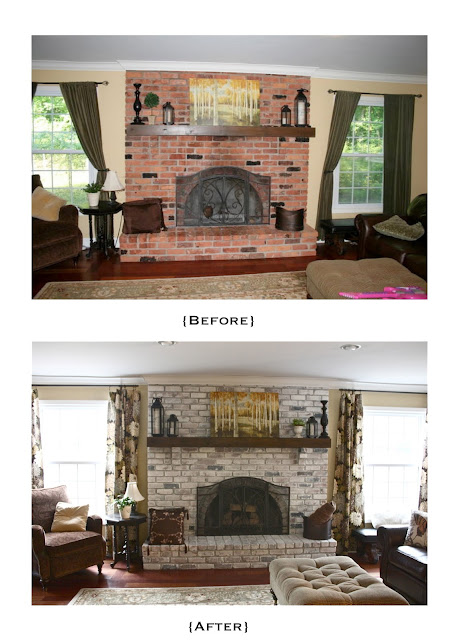
Case in point, after a brief consultation in their living room, they took it from this...


{Before}


To this...
{After}


in no time flat.  

Immediately after I met with Sarah and discussed the option of painting their fireplace, they got to work researching brick painting techniques.   They decided to go for a white-wash finish as opposed to an opaque paint finish {which was a great choice}.  They tucked their 4 small children into bed and went to town on the fireplace.  This project took about 3 hours to complete.  

Here's what they used:
1.  latex paint (Sherwin Williams Cashmere Paint~Medium Lustre~Luminous White)
2.  water
3.  a paint brush
4.  a rag


Here's how they did it...


First, they removed the wood mantle.  Then, using a mixture of equal parts of latex paint and water, one of them applied it to the bricks with a paintbrush while the other followed behind with a rag removing the access.


After one application, they were happy with the results.  You can use multiple coats (by repeating the process) depending on the coverage you prefer.  The white wash technique allows the variation in the color of the bricks to show through.  Brick is extremely porous and absorbs paint unevenly, which is a good thing in this example.  It created a beautiful, aged finish full of character.  All brick is different, if possible, my advice is to spot test this technique on your brick material in an inconspicuous area prior to tackling this project.  This will insure that you will be happy with the results. Sarah and EJ spot tested under their mantle. 


If your mantle cannot be removed and your intention is not to paint it, you may want to cover it with plastic and tape to prevent drips.


I apologize if you were waiting for a long, drawn out, step by step tutorial.  This project is too simple and easy for me to complicate.  If you are a fan of intimidating, stressful, complicated, multi-step, time-consuming, DIY projects that require a ton of special supplies and mad skills, this isn't the project for you. 


EJ and Sarah, thanks for letting me share your project.
Once again, you guys have done a phenomenal DIY job. 


For information on my affordable design services, please click here. 

No-Sew DIY Star Drapes~Tutorial


Today, I'd like to share how I created semi-custom star drapes for my boys room.  These no-sew drapes were a quick, simple project that only set me back $35.  The process I used is similar to my DIY Striped Drapes.


 Here is what I used...

One pair navy blue cotton twill drapes, one large cotton twill white tablecloth, and two tubes of liquid stitch.  If you decide to use white fabric by the yard in place of the tablecloth, heavy cotton canvas or twill would work best.  If the fabric is too thin you may be able to see the fabric glue through the white fabric {these drapes aren't looking to win any t-shirt contests}.  


Here is how I did it:


1.  First, I found a star shaped object to trace.  If you don't have a dusty tin star, you could print a star from your computer and trace it onto cardboard to create a template. 


 2.  Using a sharpie, I traced 14 large stars on the tablecloth.  If you would like to prevent black marks all over your white table, place newspaper under your fabric.  
{Luckily, I had that glass of wine before I noticed it}.


3.  After the stars were cut out, I pressed each one using heavy spray starch.  


4.  After a few coats of heavy starch they were nice and stiff.  I folded each one in half and gave it a gentle press down the center.


5.   I ironed both panels and starched them as well.  Then, repeatedly folded them in half, ironing a gentle press with each fold.  This created a grid for lining up the stars.  


6.  By lining up the press marks on the stars with the press marks on the panel, they were straight and {almost} perfectly spaced. This saved me a ton of time measuring. 


7.  The next step was gluing the stars to the panel.  I put a bead of fabric glue around the perimeter of each star.  You could also use Stitch Witchery fabric tape if you wanted to avoid glue.  If your fabric is thin,  fabric tape is a better option.


8.  To keep the glue from drying too fast,  I went tip by tip.  I applied the glue one tip at a time and ironed as I went along.  It's important to follow the instructions on the fabric glue for heat setting and use of a press cloth.  


9.  After the stars were attached, I ironed out the press marks and trimmed the excess fabric from the stars along the sides. 


 The boys love how the star pattern on both panels line up when they are pulled shut at night.  They create a really cool starry night effect. 


Please let me know if you are making these,  I'd love to see photos of your finished project.  

My facebook page is a great place to share photos and tell us about your decor projects.


For information on my affordable online design service, please click here. 

DIY No-Sew Star Drapes

I've been busy updating the boys room little by little.  The time has come to graduate from the nautical theme into a more mature design that reflects their love of sports {sniff}.   I few weeks ago I shared the first two projects we tackled, The DIY Interchangeable Trophy Shelf and The Custom Sports Equipment Closet.

This week,  I finished their new semi-custom drapes...


It's kind of funny referring to them as "semi-custom".  That phrase makes them sound fancier than they are.  This no-sew project took less than 2 hours to complete.  The process is similar to my DIY Striped Drapes just a little quicker.

It's a perfect nap time project. 


The total cost was $35.  It would have been less if I was able to use their current navy drapes.  After removing them I noticed they were faded and needed to be replaced. 


Here is what they had before...


{Before}


And now...


{After}


The addition of the stars completely changed the space.  
The large graphic pattern had a huge impact on the tiny room. 


After the drapes were up, I realized I no longer needed as many accessories as I originally thought.  The new drapes and bold wall stripes brought enough visual interest and personality to the space. 


Less clutter makes me a happy girl. 


I'll be posting a step by step tutorial for this project on Monday.

{Click here to see the step by step tutorial}

If you would like to whip up a pair, here's what you will need to pick up this weekend...


one pair of dark canvas drapes ($17 Walmart), one large white tablecloth or canvas/twill fabric ($13 Target), two tubes of Liquid Stitch or StitchWitchery Fabric Bonding Tape (Walmart $3) and a Sharpie.


Thanks for stopping by. 
For information on my affordable online design services, please click here.

Family Room Re-Design~Before and After


Today's before and after is a re-design of a traditional style family room belonging to this guy, Zeke, and his human family of six.  You may remember Sarah's Dining Room Before and After from last year.  This gorgeous space resides in the same home.  I had the privilege of consulting with Sarah {and Zeke} on their family room also. 


Here is a look at their family room before:


{Before}


And here it is now:


{After}


The space was beautiful to start with but, a little dark.  To lighten it up I suggested painting the fireplace brick.  After researching a few different techniques, Sarah decided to go with a white-wash finish as opposed to an opaque paint finish. 


White-washing was a great choice for this project.  It allowed the variation of the brick to show through creating a gorgeous aged finish.  It brightened up the space without looking stark or too new.
Like it's always been this way. 

I'll be sharing a tutorial on the technique she used later this week.


Another small change that had a dramatic affect is the new drapery.   Sarah made the drapes from a beautiful, bold floral fabric.  The color and pattern added a contemporary nudge to the otherwise traditional space.  By hanging the new drapes higher, just below the crown molding, the room feels taller.


Here's another peek at the before:


And after:


Just a few changes and this room has a totally new feel. 
Thank you Sarah, for inviting me into your home and allowing me to share your beautiful space.


For information on my affordable design services, please click here


Related Posts Plugin for WordPress, Blogger...
 
SITE DESIGN BY DESIGNER BLOGS